Wednesday, July 20, 2022

Membuat Bootable UFD Installer (Multi) OS Bagian ke-2: Ventoy


Biasanya satu image ISO / OS hanya bisa ditulis ke satu UFD. Bagaimana kalau kita mau image-image tersebut dalam satu UFD sekaligus? Ada artikel yang pernah dipublish penulis  di tahun 2018, 'Creating Bootable USB OS Installer' yang membahas aplikasi multisystem. Kali ini penulis akan membahas aplikasi sejenis yaitu Ventoy:

Ventoy

Berikut caranya:
  1. Download Aplikasinya & ekstrak dalam folder pilihan anda
  2. Jalankan  aplikasinya, 
    1. gunakan ini di terminal dalam folder aplikasinya:
      $sudo ./VentoyGUI.x86_64
    2. Pilih USB flashdisk  (UFD) yang akan digunakan Multi ISO Installer
    3. Pilih tipe partisi. MBR untuk PC yang hanya memakai BIOS  (Non UEFI), GPT untuk PC baru)
    4. Pilih Install


  3. Aplikasi akan membuat 2 partisi/volume di UFD Anda, pertama untuk boot (VTOYEFI), ke-2 untuk menyimpan image OS (Ventoy).
  4. Copy image OS Anda (*.iso) ke Partisi ke-2 (Ventoy)
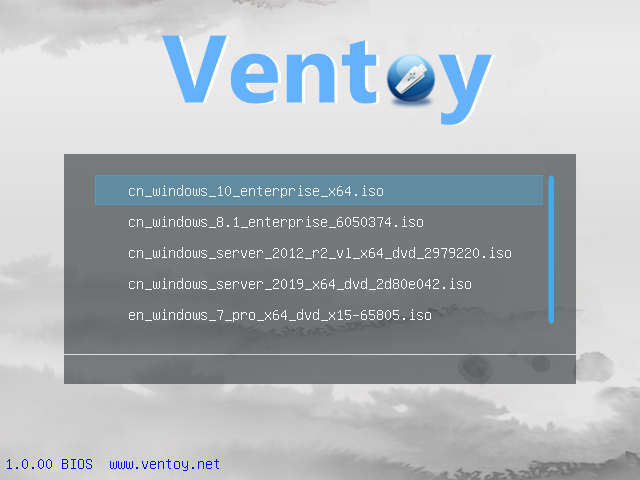
  5. Boot ke USB
Anda dapat menempatkan file ISO sebanyak mungkin di partisi ke-2 karena prosesnya cuma cut/copy & paste sederhana, tidak perlu konfigurasi lebih lanjut.

ISO Image yang penulis uji:
  1. Image / Installer OS Linux: Linux Mint, Linux Mint LMDE, Ubuntu, POP_OS!, Manjaro & Chimera OS. Tentunya akan bisa berfungsi dengan image / installer OS Linux lainnya di luar sana.
  2. Image / Installer OS Windows: Windows 7 / 8.1 / 10. Tiny10 (Windows 10 Enterprise LTSC minimal)  adalah pengecualian, dia lebih berfungsi sebagai image tunggal (Anda bisa menggunakan multisystem atau balenaEtcher untuk menulis ISO ke UFD)
  3. ISO Utilitas: Parted Magic, UBCD, UBCD Live. Beberapa utilitas seperti G4L (HDD Cloning) dan ISO Antivirus populer, menolak untuk boot


Creating Bootable UFD (Multi) OS Installer Part 2: Ventoy


Usually one ISO (OS) image can only be written to one UFD. What if we want these images in one UFD at once? There is an article published by the author in 2018, 'Creating Bootable USB OS Installer' which discussed application called multisystem. This time the author will discuss similar application, Ventoy

Ventoy

Here's how:

  1. Download the App & extract it in your preferred folder
  2. Run the app, 
    1. use this on terminal inside the extracted app folder:
      $sudo ./VentoyGUI.x86_64
    2. Choose the USB flashdisk  (UFD) to be used for Multi ISO Boot. 
    3. Choose the partition type (MBR for older/BIOS only PC & GPT for newer)
    4. click Install


  3. It will then create 2 partitions/volumes in your UFD, 1st for boot (VTOYEFI), 2nd for OS images space (Ventoy).
  4. Copy your OS images (*.iso) to 2nd Partition  (Ventoy)
  5. Boot to USB
You may put as many ISO in the 2nd partition as the process is a simple copy/cut & paste, no need further configuration.

Tested with:
  1. Linux OS images / installer: Linux Mint, Linux Mint LMDE, Ubuntu, POP_OS!, Manjaro & Chimera OS. Surely it will work with any other Linux OS images / installer out there.
  2. Windows OS images / installer: Windows 7 / 8.1 / 10. Tiny10 (Custom to Minimal / Trimmed Windows 10 Enterprise LTSC) was the exception, it rather work alone (you might want to use multisystern or balenaEtcher to write the image to UFD)
  3. Utilities ISO: Parted Magic, UBCD, UBCD Live. Again, some utility like G4L (HDD Cloning) and popular Antivirus ISO, refused to boot


Creating Bootable UFD OS Installer Part 1: balenaEtcher

As computer enthusiast, we really want to try various computer OS for various reasons, whether we want to upgrade, are bored, disappointed, or are looking for new challenges. On the internet there are many computer OS images that can be downloaded, write to CD/UFD and to try them immediately (Live CD/UFD for various Linux distributions) or just as an installation media (MacOS & Windows). 

On Linux apart from internal utility from the OS such as USB Image Writer from Linux Mint, there are few applications to help you write OS images such as balenaEtcher and Ventoy

balenaEtcher


balenaEtcher or simply Etcher Is a single ISO image flasher/writer application to UFD AND ALSO TO MEMORY CARDS for Linux/MacOS/Windows. This application is an alternative to the Rufus utility on Windows which functions more or less the same.
Here's How:
  1. Download the app & extract it in your preferred folder
  2. use this on terminal inside the extracted app folder:
    $sudo chmod 777 *.AppImage
  3. Run the AppImage file 
    1. eg. $./balenaEtcher-1.7.9-x64.AppImage 
    2. Select Image to write, device to write on to, flash!
    3. You can now boot the UFD
Reference: https://www.balena.io/etcher/

Membuat Bootable UFD Installer OS Bagian ke-1: balenaEtcher

Sebagai pengguna antusias komputer, kita sangat ingin mencoba berbagai OS komputer karena berbagai alasan, entah ingin mengupgrade, bosan, kecewa, atau sedang mencari tantangan baru. Di internet banyak sekali image OS komputer yang bisa didownload, ditulis ke CD/UFD dan langsung dicoba (Live CD/UFD untuk berbagai distro Linux) atau hanya sebagai media instalasi (MacOS & Windows).

Di Linux selain aplikasi internal dari OS seperti USB Image Writer dari Linux Mint, ada beberapa aplikasi untuk membantu Anda menulis image OS seperti balenaEtcher dan Ventoy 

balenaEtcher


balenaEtcher atau Etcher adalah aplikasi flasher/penulis image OS tunggal ke UFD DAN JUGA KE KARTU MEMORY untuk Linux/MacOS/Windows. Aplikasi ini adalah alternatif dari utility Rufus di Windows yang fungsinya kurang lebih sama.
Berikut Caranya:
  1. Download aplikasinya & ekstrak di folder pilihan Anda
  2. gunakan ini di terminal di dalam folder aplikasi yang diekstraksi:
    $sudo chmod 777 *.AppImage
  3. Jalankan fils AppImage 
    1. contoh: $./balenaEtcher-1.7.9-x64.AppImage 
    2. Pilih Image untuk ditulis, perangkat yang akan ditulis, flash!
    3. Boot ke UFD
Referensi: https://www.balena.io/etcher/

Sunday, July 17, 2022

Mid-2022!

 Now I have the time to post few things to my blog. Hope this would help me to recollect these things later on

<bahasa indonesia>
Sekarang saya punya waktu untuk mem-posting beberapa hal ke blog saya. Semoga ini bisa membantu saya untuk mengingat hal-hal ini nantinya

Mematikan Windows Fast-Start HDD Lock dari Linux

 Jika Anda melakukan dual-boot Linux Anda dengan Windows 8.x / 10 (biasanya untuk gaming), Anda mungkin mengalami bahwa Anda tidak dapat menulis atau memuat/mount drive NTFS Anda (baik yang digunakan sebagai sistem atau data saja). Ini biasanya disebabkan oleh Windows Fast-Start HDD Lock

Solusi Umumnya adalah Nonaktifkan Windows Fast-Start dari Windows. Ini mengharuskan Anda untuk boot ke Windows, nonaktifkan fast-start dari Settings - Power Option - Choose what the power buttons do - Change settings that are currently unavailable - Shutdown settings - hilangkan centang Turn on fast startup - full shutdown Windows - reboot ke Linux

Jika gagal maka Anda dapat memaksa untuk Mematikan Windows Fast-Start HDD Lock dari Linux anda.Ada perintah ntfsfix (bagian dari paket ntfs-3g), yang memperbaiki beberapa inkonsistensi NTFS, mengatur ulang file jurnal NTFS dan menjadwalkan a Pemeriksaan konsistensi NTFS untuk boot pertama ke Windows. Ini mungkin dapat merusak instalasi Windows Anda, jadi tidak disarankan untuk drive sistem

Namun ini dapat berguna dalam beberapa kasus.Misalnya, jika Anda tidak lagi menginstal Windows 10 atau 8, tetapi partisi NTFS dibiarkan dalam keadaan hibernasi (Terkunci).Dalam kasus tersebut, Anda dapat menggunakan:

sudo ntfsfix /dev/<NTFS_partition> (misalnya /dev/sdb1)

untuk membuat partisi dipasang dengan akses baca/tulis penuh.

sumber: https://www.linuxuprising.com/2019/01/fix-windows-10-or-8-partition-mounted.html

How to Manually Turn-Off Windows Fast-Start HDD Lock from Linux

If you dual-boot your Linux with Windows 8.x/10 (usually for gaming), you may experienced that you cannot write or possibly your NTFS drive whether they used as system or data only. This usually caused by Windows Fast-Start HDD Lock 

Current solution is to Disable Windows Fast-Start from within Windows. It requires you to boot to Windows, turn-off the fast-start from Settings - Power Option - Choose what the power buttons doChange settings that are currently unavailableShutdown settings - uncheck the Turn on fast startup - full shutdown Windows - reboot to Linux

Should it failed then you can force to Turn-Off Windows Fast-Start HDD Lock  from your Linux. There is the ntfsfix command (part of the ntfs-3g package), which repairs some NTFS inconsistencies, resets the NTFS journal file and schedules a NTFS consistency check for the first boot into Windows. This might corrupt your Windows installation though, so it's not recommended for system drive

However it can be useful in some cases. For example, if you're no longer have Windows 10 or 8 installed, but a NTFS partition was left in a hibernated state (Locked). In such cases, you could use: 

sudo ntfsfix /dev/<NTFS_partition> (for example /dev/sdb1) 

to get the partition to mount with full read/write access.

source: https://www.linuxuprising.com/2019/01/fix-windows-10-or-8-partition-mounted.html